Friday, 9 December 2011
Tuesday, 6 December 2011
GROUP ANIMATING
ANIMATING:
The group made a decision to split up the animating element of our final composition.
We hoped to achieve and learn new animating techniques and successfully implement new practices.
We broke all of our sections down into scenes to help compact the workload and spread it out amongst us so that we would be able to share the animation as a group.
(Whether this decision was successful is yet undetermined, as it made it harder to keep consistency with lighting and smoothness, we possibly lost a little bit of time in doing so, as we needed to adapt scenes a few times to ensure continuity, though it did help to spread the work out.)
Our scenes were set at 25 fps and rendered uncompressed with HD resolution 1280x720.
The scenes were broken down as follows:
Scene 1: (Table and Hand) - Hong and Jack
Technique Used: (Light Technique)
Scene 2: (Blueprint Visualisation) - Andrew
Technique Used: Slice Technique
Scene 3: (Walk through House) - Steve and Hong
Technique Used: Biped / Footsteps
Scene 4: (External Pullout) - Hong and steve worked on the final scene
Technique Used: Path Constraint
The Morpher technique was used to test out the fire and create flames, though this isn't actually shown in our final animation.
Cameras, Lighting and Setting Keyframes.
Steve - Compiled animation in Premier Pro and provided original music composition for the soundtrack.
General Tweaks:
- We had to scale down some of our assets a bit to include the biped, as we had an issue of it fitting through the doors of our building.
- A lot of time was taken to ensure all of our Camera moves were effective and realistic pushes.
- Lots of Re-renders in order to ensure consistency of scenes.
Scene 1:
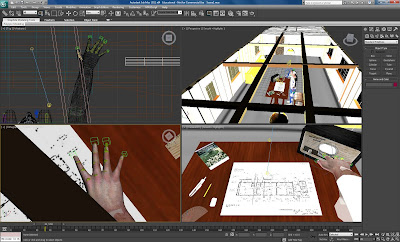
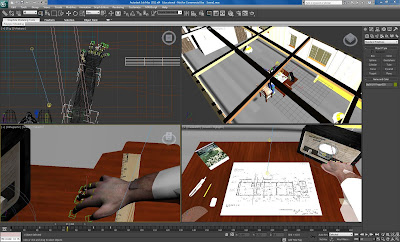
Keyframe allocation.
In order to create a first person view extra attention was taken to create an effective hand movement to turn on the radio.
Positioning the arm/hand and the camera, set key was used to assign the movements and push in camera moves.
This Segment - 6 seconds - 150 frames
An omin light is applied slighly inside of the radio, with 18 multiplier and using the far attenuation with 6.163 start to 8.415 end. Autokey is then used to change the multiplier up and down, so it looks like the light turns on.
Scene 2:
Building Elevation:
For the blueprint scene the idea was to introduce the items and structure of the building into our frame individually as time progresses. To achieve this the Slice Modifier Technique was used.
A slice modifier was applied to the walls of the guildhall as well as all the items inside the guildhall. Some of the smaller items were grouped together so that they were easier to animate.
The modifier was set to remove top and the slice plane was moved so that the object selected could not be seen. The timeline was moved to another frame and Auto key turned on, next the slice plane was moved so it was above the selected object and it was no longer being sliced.
This added a key frame at the beginning of the timeline and on the current frame. These could be moved to speed up or slow down the grow animation and change the frame on which the object would start to grow.
This was repeated for all of the objects in the scene and the start and end frame of each was adjusted to create an organic growing effect where the items grew randomly but with some structure, so the items in the scene didn't start growing until the floor was in place.
This segment edited is 41 seconds: 1025 frames
A More Detailed explanantion can be found on andrew's blog: (linked below)
Andrew's Detailed Write Up
Scene 3:
(Hong - Biped Rig)
Footstep Animation: Steve and Hong
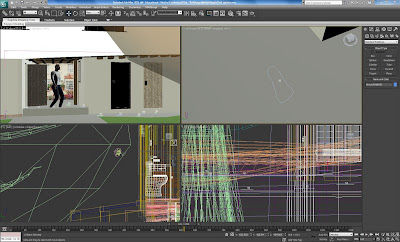
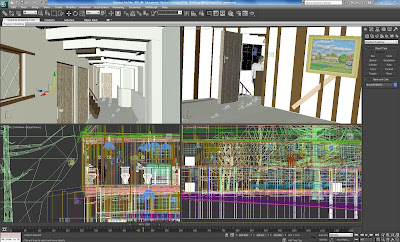
To start this scene the biped model was imported into to the scene, starting on the second floor. Click on the biped, motion is then selected and footstep mode turned on. Create multiple footsteps was used to step out the amount of footsteps needed. The move and rotate tools were used to adjust the footprints. To open the door, the biped fingers were selected and rotated by each joint.
As the biped moves outside, we noticed the background was too grey, so to modify this the daylight system was selected from the modify panel, daylight parameters chosen: mr sun and mr sky with lower horizon height from the mr sky advanced parameters.
Morpher was used to animate the fire movement within the fireplace in the library. We hadn't previously realise that the fire would be in the scene, so when it became apparent in our walkthrough section, we decided to introduce this technique.
In terms of camera movement and selection, basically two styles of camera were used: free camera and target camera. Really we just spent time creating what we felt was the best way to follow our character. In difficult areas, we used cut-aways on another camera to help us within the editing process.
(93 footsteps were used in this sequence)
New Techniques: Biped, Footsteps, Morpher and Daylight System
Scene 4: (External Pullout)
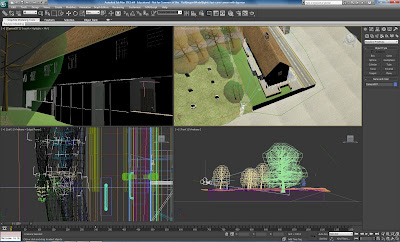
For the final scene the biped carries on walking down the street. The line tool was used to create a path for the camera. A target camera was created and animation selected, constraints was then selected in the animation sub-menu, then path constraint was chosen and the camera added to the line.
(16 footsteps were used in this segment)
EDITING & COMPILING:
Once we had rendered and then seen our mistakes and inconsistencies .... and rendered again, all the scenes were imported into premier pro, within here we added an original composition to our final video and basically compiled 2 versions of our video. A full version which runs at 2mins and incorporates a walkthrough plus a shorter 1minute edit of just our blueprint build scene.
Steve provided the music from a piece of he had written.
Our scenes were rendered and exported as 1280x720 uncompressed.avi
(.f4v and .mov versions were also created)
The group made a decision to split up the animating element of our final composition.
We hoped to achieve and learn new animating techniques and successfully implement new practices.
We broke all of our sections down into scenes to help compact the workload and spread it out amongst us so that we would be able to share the animation as a group.
(Whether this decision was successful is yet undetermined, as it made it harder to keep consistency with lighting and smoothness, we possibly lost a little bit of time in doing so, as we needed to adapt scenes a few times to ensure continuity, though it did help to spread the work out.)
Our scenes were set at 25 fps and rendered uncompressed with HD resolution 1280x720.
The scenes were broken down as follows:
Scene 1: (Table and Hand) - Hong and Jack
Technique Used: (Light Technique)
Scene 2: (Blueprint Visualisation) - Andrew
Technique Used: Slice Technique
Scene 3: (Walk through House) - Steve and Hong
Technique Used: Biped / Footsteps
Scene 4: (External Pullout) - Hong and steve worked on the final scene
Technique Used: Path Constraint
The Morpher technique was used to test out the fire and create flames, though this isn't actually shown in our final animation.
Cameras, Lighting and Setting Keyframes.
Steve - Compiled animation in Premier Pro and provided original music composition for the soundtrack.
General Tweaks:
- We had to scale down some of our assets a bit to include the biped, as we had an issue of it fitting through the doors of our building.
- A lot of time was taken to ensure all of our Camera moves were effective and realistic pushes.
- Lots of Re-renders in order to ensure consistency of scenes.
Scene 1:


Keyframe allocation.
In order to create a first person view extra attention was taken to create an effective hand movement to turn on the radio.
Positioning the arm/hand and the camera, set key was used to assign the movements and push in camera moves.
This Segment - 6 seconds - 150 frames
An omin light is applied slighly inside of the radio, with 18 multiplier and using the far attenuation with 6.163 start to 8.415 end. Autokey is then used to change the multiplier up and down, so it looks like the light turns on.
Scene 2:
Building Elevation:
For the blueprint scene the idea was to introduce the items and structure of the building into our frame individually as time progresses. To achieve this the Slice Modifier Technique was used.
A slice modifier was applied to the walls of the guildhall as well as all the items inside the guildhall. Some of the smaller items were grouped together so that they were easier to animate.
The modifier was set to remove top and the slice plane was moved so that the object selected could not be seen. The timeline was moved to another frame and Auto key turned on, next the slice plane was moved so it was above the selected object and it was no longer being sliced.
This added a key frame at the beginning of the timeline and on the current frame. These could be moved to speed up or slow down the grow animation and change the frame on which the object would start to grow.
This was repeated for all of the objects in the scene and the start and end frame of each was adjusted to create an organic growing effect where the items grew randomly but with some structure, so the items in the scene didn't start growing until the floor was in place.
This segment edited is 41 seconds: 1025 frames
A More Detailed explanantion can be found on andrew's blog: (linked below)
Andrew's Detailed Write Up
Scene 3:
(Hong - Biped Rig)
Footstep Animation: Steve and Hong


To start this scene the biped model was imported into to the scene, starting on the second floor. Click on the biped, motion is then selected and footstep mode turned on. Create multiple footsteps was used to step out the amount of footsteps needed. The move and rotate tools were used to adjust the footprints. To open the door, the biped fingers were selected and rotated by each joint.
As the biped moves outside, we noticed the background was too grey, so to modify this the daylight system was selected from the modify panel, daylight parameters chosen: mr sun and mr sky with lower horizon height from the mr sky advanced parameters.
Morpher was used to animate the fire movement within the fireplace in the library. We hadn't previously realise that the fire would be in the scene, so when it became apparent in our walkthrough section, we decided to introduce this technique.
In terms of camera movement and selection, basically two styles of camera were used: free camera and target camera. Really we just spent time creating what we felt was the best way to follow our character. In difficult areas, we used cut-aways on another camera to help us within the editing process.
(93 footsteps were used in this sequence)
New Techniques: Biped, Footsteps, Morpher and Daylight System
Scene 4: (External Pullout)

For the final scene the biped carries on walking down the street. The line tool was used to create a path for the camera. A target camera was created and animation selected, constraints was then selected in the animation sub-menu, then path constraint was chosen and the camera added to the line.
(16 footsteps were used in this segment)
EDITING & COMPILING:
Once we had rendered and then seen our mistakes and inconsistencies .... and rendered again, all the scenes were imported into premier pro, within here we added an original composition to our final video and basically compiled 2 versions of our video. A full version which runs at 2mins and incorporates a walkthrough plus a shorter 1minute edit of just our blueprint build scene.
Steve provided the music from a piece of he had written.
Our scenes were rendered and exported as 1280x720 uncompressed.avi
(.f4v and .mov versions were also created)
Monday, 5 December 2011
GROUP SWOT ANALYSIS
STRENGTHS:
- Good Group Dynamic
- Strong Organisation/Communication/ Motivation
- Hard Working and Dedicated
- Desire to Succeed
- Attention to Detail
The nice dynamic about our group is that we have a good mix of ability. Hong and Andrew are terrific modellers and their skilled efficiency has helped the group. Steve and Jack provide the more creative side of the team with good ideas and attention to detail.
Being a group of computer game players has probably slightly influenced our production and gives us a good understanding of what we hope to achieve visually.
As a group we worked successfully as a team. Everybody has tried to dig in and do their part to help the production.
(Steve) Good Leader, has designated tasks and motivated the team effectively. Thoroughly enjoyed the project and have surprised myself at times with my modelling and animating.
(Jack) Modeled numerous items for the house and has played a part with paperwork and ideas.
(Hong) Feel my modelling skills have improved, have learnt a lot more about texturing. Fast at learning new techniques (e.g. biped)
(Andrew) Hard working and organised, fast at learning new techniques and solving problems that arose.
WEAKNESSES:
- A lack of animating knowledge
- Inexperience in this type of assignment
(Steve) Lack of confidence in modelling ability. Takes me a bit longer to model, need more time and a bit of direction.
(Jack) Not one of the strong modelers in the group, so reluctant to do too much incase mess up scenes.
(Hong) Writing blog.
(Andrew) Lack of animating skills especially using the slice tool, communication with other group members.
OPPORTUNITIES:
- New Techniques
- Improve modelling skills further
- To develop a new style of modelling and animating
(Jack) To learn a lot about new modeling techniques and to be part of a production relating to a real life model with a real life client.
(Hong) To learn new textures and animating techniques (e.g. tile and slice)
(Andrew) To learn new techniques for modelling and animating, to work as part of a group to create the animation and to learn from other group members.
(Steve) To explore new textures and animating techniques, the knowledge to design better models in future.
THREATS:
- The Time that we have to commit to the project
- External Commitments
- Computer Facilities
- Rendering Time
- Scene Consistency
(Hong) Time take to make detail model, moving biped and when one little mistake are made need to re rendering the scene.
(Jack) Rendering times are a problem as it can take hours to render a few seconds, especially if there is a tiny mistake. Also the lack of computers in week 12 was not helpful at all. Group of four people lead to a certain level of redundancy at times.
(Andrew) Keeping the lighting and placement of objects consistent throughout the scenes, the time that it can take to animate a scene and render it, the large scene with lots of objects caused problems with 3ds max crashing.
(Steve) Obviously as a parent, I have extra commitments and I sometimes do not have as many required hours to be able to fully be available. The time that it takes me to model my items is a little more than most of the group, it doesn't seem to come as naturally to me.
Friday, 2 December 2011
Meeting 7:
Meeting 7 Minutes:
2/12/11
GROUP: Continued Animation; RENDERING!!!!!!!!!!!, Cameras and Lighting.
Everybody in the group began to convert their files into smaller segments to begin rendering and the editing process.
All: Camera Work within our Environment. We made a decision to re-animate scenes 1 and 2 with improved lighting and biped work.
Andrew: Continuing Animation of Scene 2 (building resurrection)
(Upper Floor and Roof) , Lighting - placing lights throughout building.
This scene had to be done several times as at times we needed to ensure consistency with lighting was effective.
Hong: Made Pencil and Rubber, re-did hand, radio light technique. Biped Rig
Animating: Scene 1 and Scene 3 (walkthrough) - with Steve
Again ... all of our scenes had to be re-done a few times to ensure item and lighting consistency.
Steve: Group Blog, Animating work on scene 3 (footsteps) for walkthrough segment.
Premiere Pro Editing work, Rendering, Created original audio composition for animation.
Rendering Scenes, Animating Scene 1 with Hong.
Subscribe to:
Comments (Atom)


